
In the last article, I talked about how we were able to incubate our 25-day-old duck eggs after their mother was killed, using only a heat pad and some elbow grease. In this article, I will lay out the process that happened to transition them to our non working incubator shell and hatch successfully.

We incubated them for 10 days, caring for them four times per day, swapping out wet rags to keep the humidity level up.
Despite all odds, I heard peeping one night when I was giving them the last wet rag at bedtime. Hallelujah! The next day, there were three pipped eggs. I could hardly contain my excitement. Hatching, though, posed a new problem – how could they hatch layered under the weight of the rags and blanket?
Here is where our non working incubator came in handy. It could easily be replicated with a styrofoam cooler or even a standard plastic cooler. You just need a way to keep heat and moisture in, but with the ability to vent excess moisture out.
We have a Hovabator incubator (aff) with the channeled humidity tray beneath where the eggs go. I filled the appropriate channels for hatching to keep the humidity up. Without the incubator, I would get something like my Excalibur dehydrator tray mesh sheets that allow airflow but secure footing for hatching chicks and ducks. Place that over some lids with water in them. When working out humidity, volume of water is not important; surface area is. If you have moisture pooling at the top of your makeshift hatching area, you need to reduce the humidity. Here’s a thorough writeup on hatching humidity; combined with a sensor you’ll eliminate the guesswork.

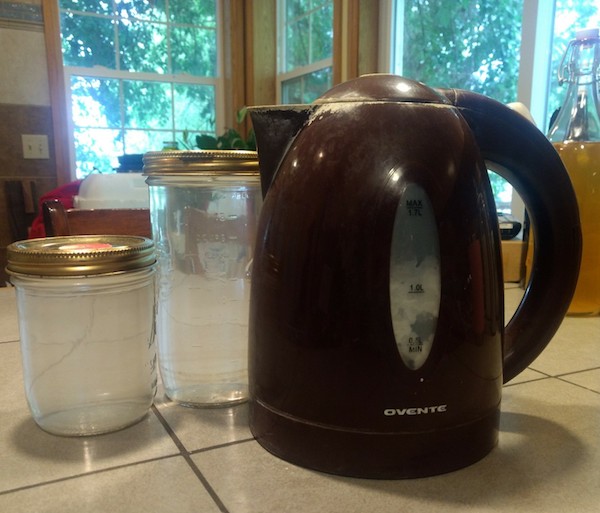
With the humidity under control, the next step is maintaining temperature of around 90 degrees. Our incubator fan worked, but it produced no heat, so it merely served to increase temperature fluctuations and muck things up. I unplugged it and maintained heat by boiling water and placing it in mason jars with tight lids. I laid these down on opposite sides of the incubator and closed the lid.
Using the cooking thermometer, I continued to monitor the temperature. Earlier in the day when the room temperature was lower, I wrapped the incubator with blankets to help hold in heat, leaving the top air hole open. If replicating in a cooler, placing a straw out the hole and wrapping the rest in blankets will help, but you’ll be opening it every few hours so that will keep fresh air coming in.
To maintain the temperature we were aiming for, we filled one quart and one pint mason jar with boiling water and placed them in the incubator. After the ducks began hatching, we covered these with rags to keep the ducklings from getting burned on the jars.
During the day, those jars needed to be refreshed with boiling water every 3-4 hours. To do this, boil the water first, then quickly open the hatching box, pull out the jars, close the lid, refill and then replace. Our temperature ranged from 93-102, because I was mistakenly thinking I needed to still aim for 100. Because of the fluctuation, it might be good to aim for about 95 so that they aren’t getting too chilled when the water cools off.
Overnight we went about 7 hours between heating. The lowest temperature we ended up with was 88 overnight during hatching. Morning room temperature then was 62, so the styrofoam and blankets did a good job of insulating and keeping the hatching box warm.
From the first pip to the first hatch was about 36 hours, but we still had pips starting 48 hours after the first. Based on this, I imagine mother raised ducks would have a higher hatch rate if we brought in the unhatched eggs when mom leaves the nest. I’m writing this at 3 p.m. on 6/28. The first cheeps were heard the evening of 6/24 and we discovered the first pips the morning of 6/25. The 9th duckling hatched about half an hour ago. Mom would surely have moved off the nest by now and left some unhatched. Now that I know we can relatively easily hatch them without a working incubator, I’m much more likely to retrieve those unhatched eggs and try to hatch them.

For brooding the hatched chicks, we set up a heat lamp in our currently unused 12’x20′ greenhouse. There are some weeds in there to eat and we added a shallow pan for swimming/drinking and ground some whole grains in our wheat grinder for feed. I bring out some treats when I go to check on them as well and added a small bowl of whey from cheese making.
After the ducklings were fully dry, I moved them out in pairs and set them up under the heat lamp, showing them food and water. As of this writing, four are safely and successfully established in the greenhouse with the week old batch of ducklings given to us a couple of days ago. I will move this morning’s hatched ducklings out either this evening or tomorrow morning, depending on how they look.
 Overall, this was a great success. From cold eggs that had little hope to–so far–nine out of ten successfully hatched is a phenomenal rate. I haven’t had that kind of luck when using a functioning incubator, let alone a jumbled together mix of tools and techniques to hatch them without one!
While we wouldn’t intentionally set out to incubate eggs this way, it has proved itself a valuable backup method for keeping eggs alive when mom is not able to. I was a bit concerned that the heat pad (aff) we were using could handle continuous heat for that long–10 days–but it held up admirably. After this experience, I’m leaning toward buying a backup to keep on hand if ever we need to do this again.
Quick update 7/1: We collected 13 eggs from the hen’s nest, but only confirmed movement in 10. As of this morning, all 13 eggs hatched successfully into thriving ducklings.
